OWL's comprehensive notification system is a crucial feature designed to enhance communication and keep
users promptly informed about significant activities, alerts, or updates within the platform. This system
empowers administrators to configure notification preferences tailored to the specific needs and roles of
users, ensuring that critical information reaches the right individuals in a timely manner.
Steps to Access Notifications:
1. Click Administration.
2. Click Notification within the OWL Admin menu.
3. This will open the Notification page.
• This page contains all notification flags based on their module and category.
• The notification flags enabled will determine what notifications are available
within Role and User Settings.
User Settings
Steps to Enable Notifications at the User Level:
1. Click Administration.
2. Click User Management.
3. Click the username you would like to enable notifications for.
4. Click Notifications.
5. Click Edit.
6. Select all appropriate notifications.
7. Click Save to complete this action.
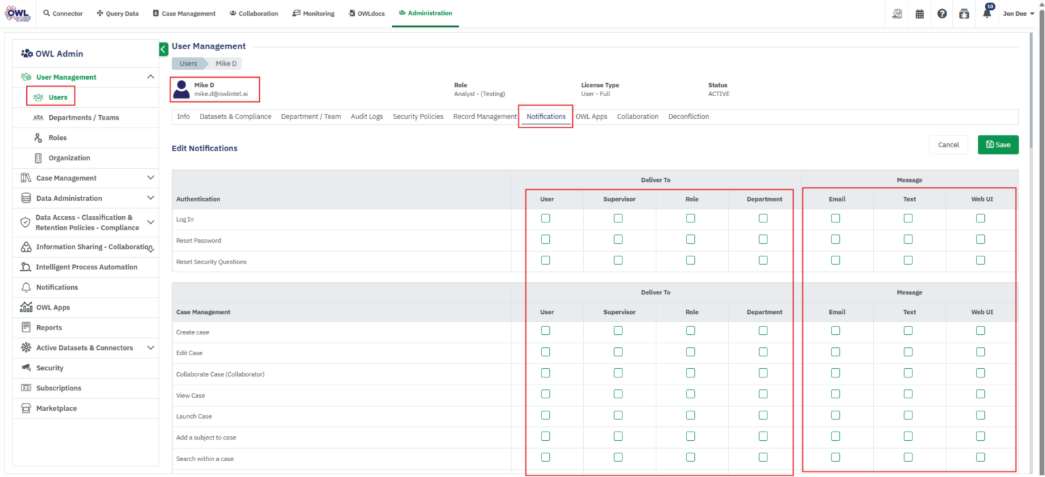
Role Settings
Steps to Enable Notifications at the Role Level:
1. Click Administration.
2. Click Organization within the OWL Admin menu.
3. Click Role Settings.
4. Select the role and license type you would like to access and click Search.
5. Click Notifications.
6. Click Edit.
7. Select all appropriate notifications.
8. Click Save to complete this action.
• Based on the selections made, email notifications will be sent to the respective users. For example, if
the department is selected, the system will generate a notification to all the users who belong to the
department.
• Once all desired notifications have been enabled within the main Notifications module, an
administrator can enable them at the role and user level.
Related to